
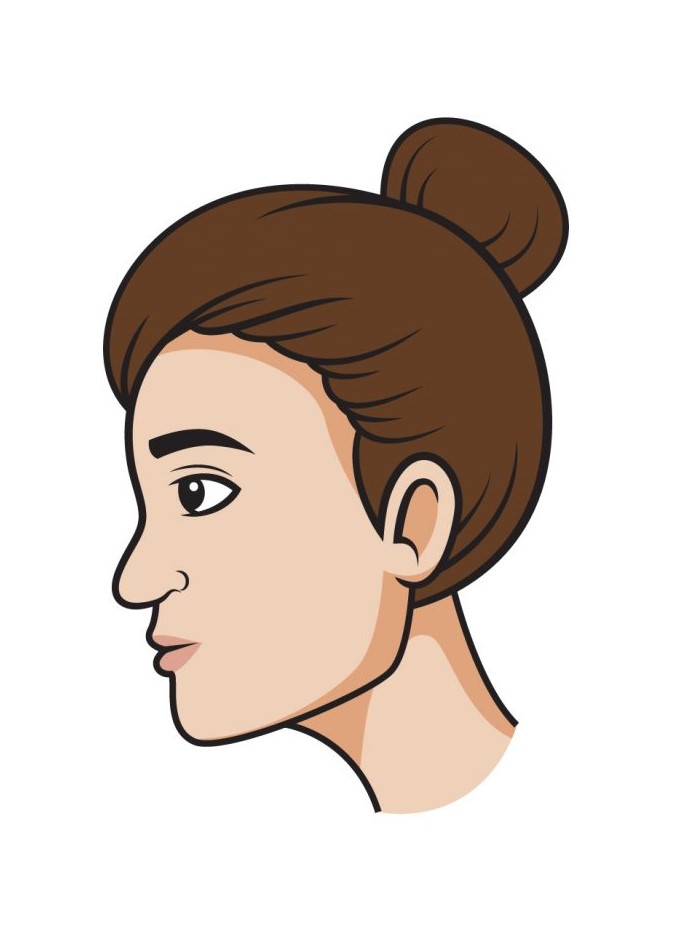
How To Draw A Sideways Face. A human’s face is a frequent theme in many works of art, and drawing is no exception. Learning to draw a human face is essential for beginners and experts alike. However, the learning continues once you learn how to draw a human face facing forward. It would be helpful to learn how to draw a side-view face. This will allow you to draw a human face in different positions.
Luckily, we’ve created a step-by-step tutorial on how to draw a face from the side, summarized in 9 quick and easy steps. Plus, each instruction comes with an illustration to make it easy to follow the steps! Have fun, and use your artistic skills to draw a sideways face! You can draw many more characters like batman drawing easy, Anubis drawing, cat drawing, cobra drawing, blueberry drawing, coconut drawing and many more drawing for kids.
Step 1:
Start by drawing a perfect circle shape to outline the character’s head. Place and use light strokes when pulling a rough sketch. Avoid pushing too hard with the pencil so you can efficiently extract parts of the system that you may not need after. As you can see in the illustration, the circle is off -centre and slightly up. Don’t fear because that’s how it should exist! This leaves enough room for the character’s chin and neck.
Step 2:
Just below the circle shape, draw a diagonal line on the left side aligned with the edge of the circle shape. This includes the lower part of the front. Once you have reached the desired length, bring the diagonal line back clockwise. Next, bring the line up until it touches the circle shape we drew earlier. This creates the shape of the character’s chin and jawline. The outline may look confusing, but it will come together once we tweak it.
Step 3:
Using an eraser, remove the overlapping circle’s bottom line inside the head’s outline. Be careful when erasing the line; you don’t want to delete essential lines accidentally. Now erase part of the left edge of the outline where we will draw the nose and mouth. Draw an extended curve for the nose and two straight curves to form the mug where we obliterated the line. As you can see in the illustration above, the shape of the head is now more visible.
Step 4:
Just below the character’s jaw, draw two curved lines angled in the opposite direction. This forms the character’s neck. Remember that the larger the space between the two lines, the wider the neck will appear.
Step 5:
Draw several overlapping curves just above the forehead. This creates the character’s hairline. Once the hairline reaches the point above the jawline, draw an angled oval shape with the bottom directly connected to the jawline. This forms the character’s ear. Remember to erase the outline of the back of the head! By doing this, you will have enough space to complete the hair.
Step 6:
Draw a semi-circle shape from the forehead to the nape of the neck. This forms all of the character’s hair. Be sure to add a few lines on the surface of the hair. This adds texture to the hair, making it smooth and, most importantly, realistic.
Step 7:
Draw another half circle at the top of the head. This includes the hair secured in a bun. Remember to add a few lines to add texture to the hair! As you can see from the illustration above, we kept our character’s hair straight and simple. Regardless, feel free to draw any hairdo you like! You can pull the hair down and wave it or draw a short pixie haircut. Everything depends on you!
Step 8:
Draw a curved line with a straight edge on the left and a sharp point on the right. This forms your character’s arched eyebrow. Be sure to fill the entire brow with a jet-black tint to make the brow look more refined.
Step 9:
To create the eyes, draw a V-shaped sideline with a pointed end on the right side. Next, draw a standing oval at the opening of the V-shaped line on the left side. This forms the pupil of the eye. Next, draw a small circle inside the pupil to create the iris. Shade the entire pupil leaving the iris unshaded. This creates a dramatic “glittering eye” effect. Remember to add a line just above the eye to create the illusion of creases or creases, making your drawing look real! Now that we’ve managed to draw a face aside, it’s time to get to the party.

